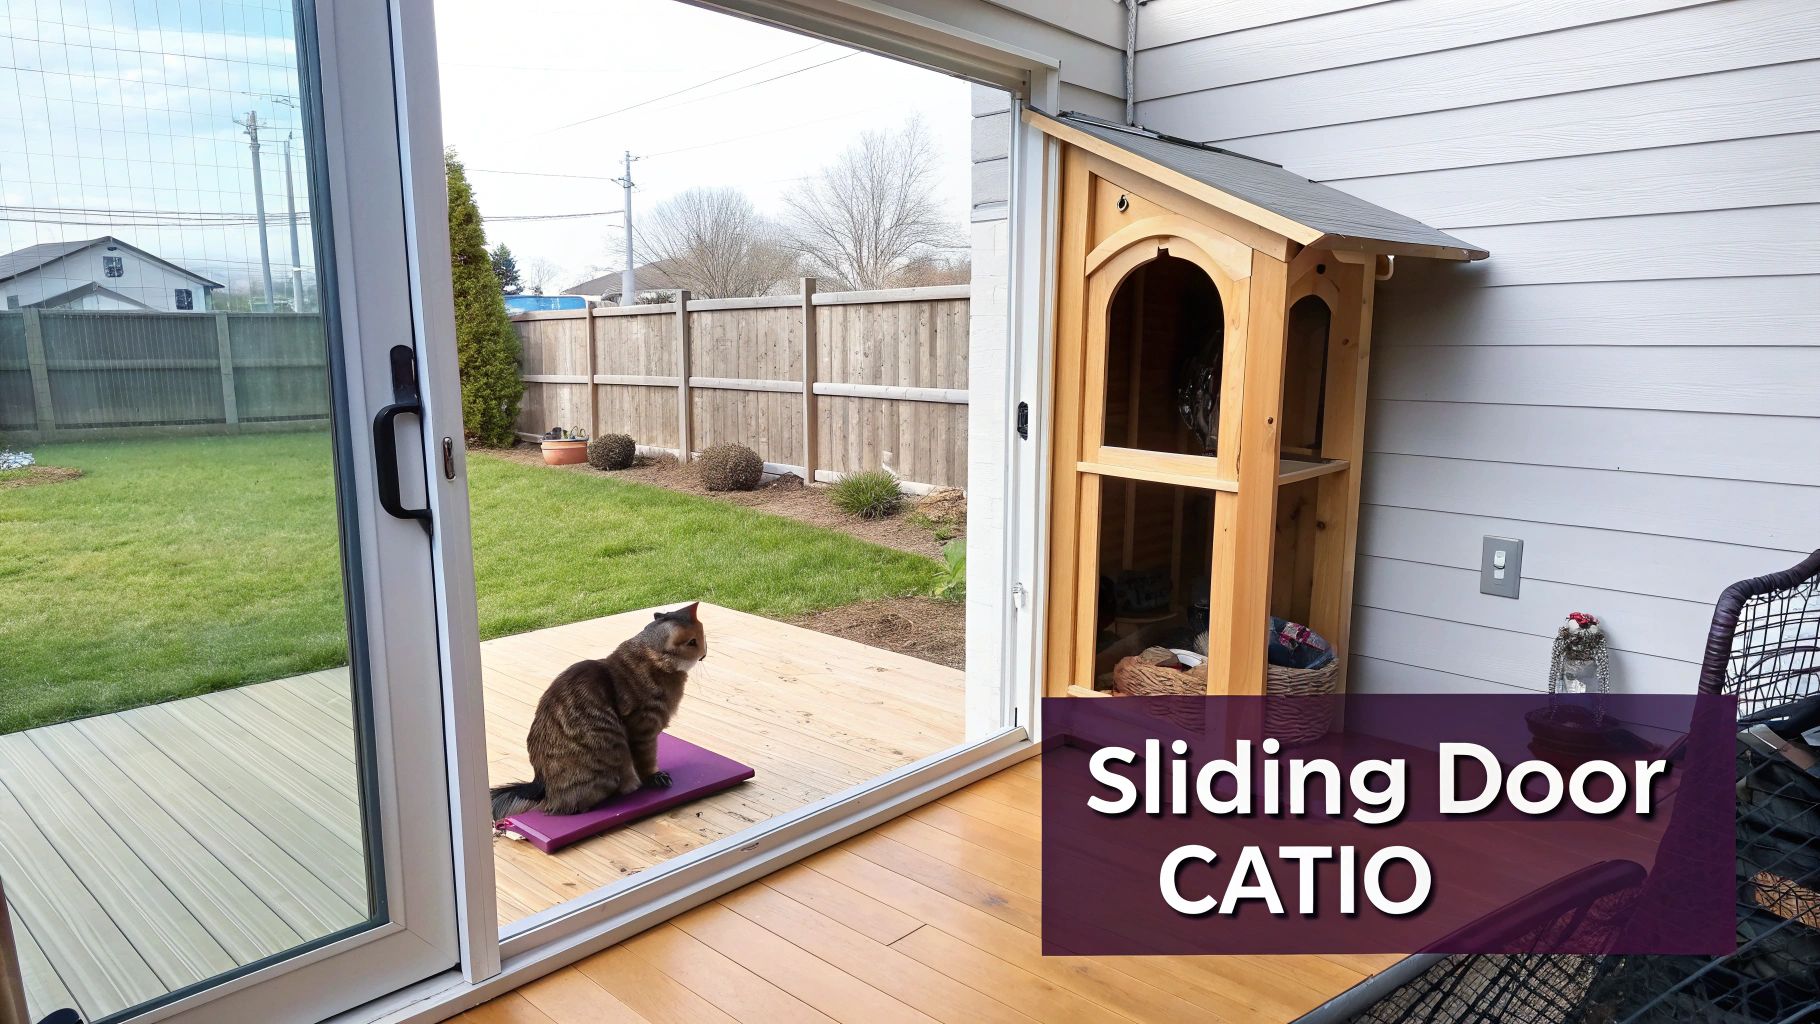
Catio for Sliding Glass Door: A Purr-fect DIY Guide 🐾

Ready to give your favorite furball a safe slice of the great outdoors? A catio for a sliding glass door is the purr-fect solution. It creates a secure, stimulating space where your indoor cat can finally enjoy some fresh air and sunshine without any of the risks. ☀️
Seriously, it’s one of the best ways to enrich their life, and our mascot, Floofie, is practically vibrating with excitement to show you how! 😻
Why Your Cat Is Begging for a Sliding Door Catio
A sliding glass door is pretty much the ideal entryway to a feline paradise. It gives you a wide, accessible opening that doesn't require tearing a hole in your wall or making permanent changes to your home's structure. This one project can totally upgrade your cat’s nine lives.
Think of it as building a private, all-inclusive resort right in your backyard. A well-designed catio provides that crucial mental and physical stimulation indoor-only cats often miss out on. It's a total game-changer for preventing boredom and the naughty behaviors that come with it.
The Pawsitive Perks of a Catio
Giving your cat access to their own little outdoor haven comes with a whole list of amazing benefits:
- Safety First!: A catio protects your little buddy from predators, cars, and other outdoor dangers. Just as importantly, it keeps the local wildlife safe from your tiny-but-mighty hunter.
- Mental Stimulation: Imagine all the new sights, sounds, and smells! It’s endless entertainment that kicks kitty cabin fever to the curb. The bird-watching opportunities alone are worth it. 🐦
- Physical Health: Catios encourage climbing, jumping, and exploring. All that extra movement promotes exercise and helps your cat maintain a healthy weight. Floofie loves doing his morning stretches on his favorite perch.
- Reduced Indoor Stress: By providing a healthy outlet for their natural instincts, a catio can help reduce anxiety and destructive behaviors like scratching the furniture.
And we're not the only ones who think so! The demand for these amazing feline additions is booming. The pet door market, which includes specialized inserts for sliding glass doors, was valued at USD 657.94 million in 2024 and is projected to skyrocket to USD 1,506.19 million by 2035. It’s clear that pet parents everywhere are investing in giving their furry family the best. You can discover more insights about the growing pet door market to see just how popular they've become.
So Many Catio Styles, So Little Time
Not all catios are created equal! The best design for you really depends on your space, your budget, and—most importantly—your cat’s personality. Some cats are perfectly happy with a small spot for sunbathing, while others need a full-blown jungle gym to feel satisfied.
Floofie’s Tip: "Meow listen up! Before you even think about building, watch where your cat loves to hang out. Are they a climber who loves high places? Or do they prefer cozy, hidden corners? Use that intel to design a space they'll actually want to use. A happy cat makes for a happy human!"
From simple window-box styles to sprawling, walk-in patios that even you can enjoy, there’s a perfect match for every home. Let’s take a quick peek at some of the most popular options to get your creative juices flowing.
Catio Styles At-a-Glance 😼
To help you narrow it down, here’s a quick comparison of the most common catio types you'll see attached to sliding glass doors. Think about your cat's dream setup and what works best for your home.
| Catio Style | Best For | DIY Effort | Floofie's Rating ⭐ |
|---|---|---|---|
| Window Box | Small spaces, apartments, sunbathers | Low | ⭐⭐⭐ |
| Panel Insert | Renters, easy installation, portability | Very Low | ⭐⭐⭐⭐ |
| DIY Enclosure | Custom sizes, multiple cats, budget-friendly | Medium | ⭐⭐⭐⭐⭐ |
| Prefab Kit | Quick setup, predictable results | Low-Medium | ⭐⭐⭐⭐ |
| Walk-In Patio | Maximum space, human-cat bonding | High | ⭐⭐⭐⭐⭐ |
Ultimately, the best catio is the one your cat will love and use safely. Whether you go for a simple sunning perch or a full-on feline palace, you're giving them a wonderful gift.
Planning Your Purr-fect Catio Project
Alright, let’s get down to the fun part! Before you even think about picking up a hammer, a solid plan is the secret ingredient to a successful catio project. Our head foreman, Floofie, has his tiny hard hat on and is ready to supervise. 👷 This is easily the most important step because getting these details right now will save you from major headaches (and maybe some serious cat-titude) down the road.
First things first, let's talk about the star of the show: your sliding glass door. The market for these doors is huge and getting bigger, with an estimated value of USD 1.7 billion in 2025 projected to soar to USD 2.5 billion by 2035. Why the boom? Homeowners want more custom options to seamlessly blend indoor and outdoor spaces—which is exactly what we're doing!
Measuring for a Flawless Fit
Accurate measurements are completely non-negotiable. Trust Floofie, a catio that’s too big or too small for your space is a non-starter. Grab a tape measure, a notepad, and let’s get these numbers locked down.
- Sliding Door Track: Measure the inside height of your sliding door track, from the very bottom groove to the tippy top of the frame. This measurement is absolutely critical if you're planning to use a pet door panel insert.
- Outdoor Footprint: Decide exactly where your catio will live. Measure the width, depth, and height of the available outdoor space. Don't forget to account for any obstacles like exterior lights, garden faucets, or sloped ground.
- Entry Alignment: Get a precise measurement of your sliding door's opening width. You need to ensure the catio entrance aligns perfectly with your pet door panel for a secure, draft-free fit.
Floofie’s Blueprint Tip: "Use painter's tape to mark the catio's footprint on the ground. It really helps you visualize the final size and make sure you're not accidentally blocking a sprinkler head. You'll thank me later!" 😹
Choosing the Right Materials
The materials you choose will determine your catio's durability, safety, and overall vibe. You want something that can stand up to both the weather and a curious cat's claws.
Frame Materials:
- Pressure-Treated Wood: This is an excellent, sturdy choice that resists rot and insects. You can paint or stain it to match your home's exterior for a really polished look.
- Cedar: Naturally weather-resistant and looks gorgeous, but it can be a bit more expensive upfront.
- PVC or Vinyl: A lightweight, low-maintenance option that won't rot or warp. It's a great choice if you're going for a more modern aesthetic.
Screening Materials:
- Welded Wire Mesh (1.5" x 1.5" or 2" x 2"): This is the gold standard for a reason. It's strong enough to keep predators out and ensures your kitty can't squeeze through. Floofie insists on 14- or 16-gauge thickness.
- PVC-Coated Wire: This is a fantastic upgrade! The coating is gentler on your cat's paws if they turn out to be a climber, and it adds an extra layer of rust protection.
When you're in the planning phase, selecting the right door system is also a big piece of the puzzle for both function and looks. You might find some great ideas in guides on choosing the best sliding door system that can help shape your overall design.
Permanent Palace or Renter-Friendly Retreat?
One of the biggest decisions you'll make is whether to build a permanent structure or a temporary, renter-friendly one. A permanent catio can be larger and more integrated with your home, but a temporary one offers incredible flexibility.
For renters, a freestanding catio that sits flush against a pet door panel insert is the way to go—no drilling, no angry landlords!
This planning stage is also a great time to think about overall safety beyond the catio itself. For a complete rundown, check out our guide on how to cat-proof your home to ensure every part of your feline's environment is safe and secure.
Now, let's gather our tools!
How to Build Your DIY Catio Frame
Alright, let's get our paws dirty! 🐾 The plans are drawn, the materials are waiting, and your furry supervisor is probably judging your every move. It's time to bring that catio for a sliding glass door to life by building a sturdy, reliable frame.
Think of this as the skeleton of your cat's new favorite spot. We'll break down every step to make it fun and totally manageable. Even if you've never built anything more complicated than a cardboard box fort (which cats also adore, to be fair), you've got this! We're about to create a safe, escape-proof paradise. 🛠️
This simple flow chart gives you a bird's-eye view of our catio project from start to finish.
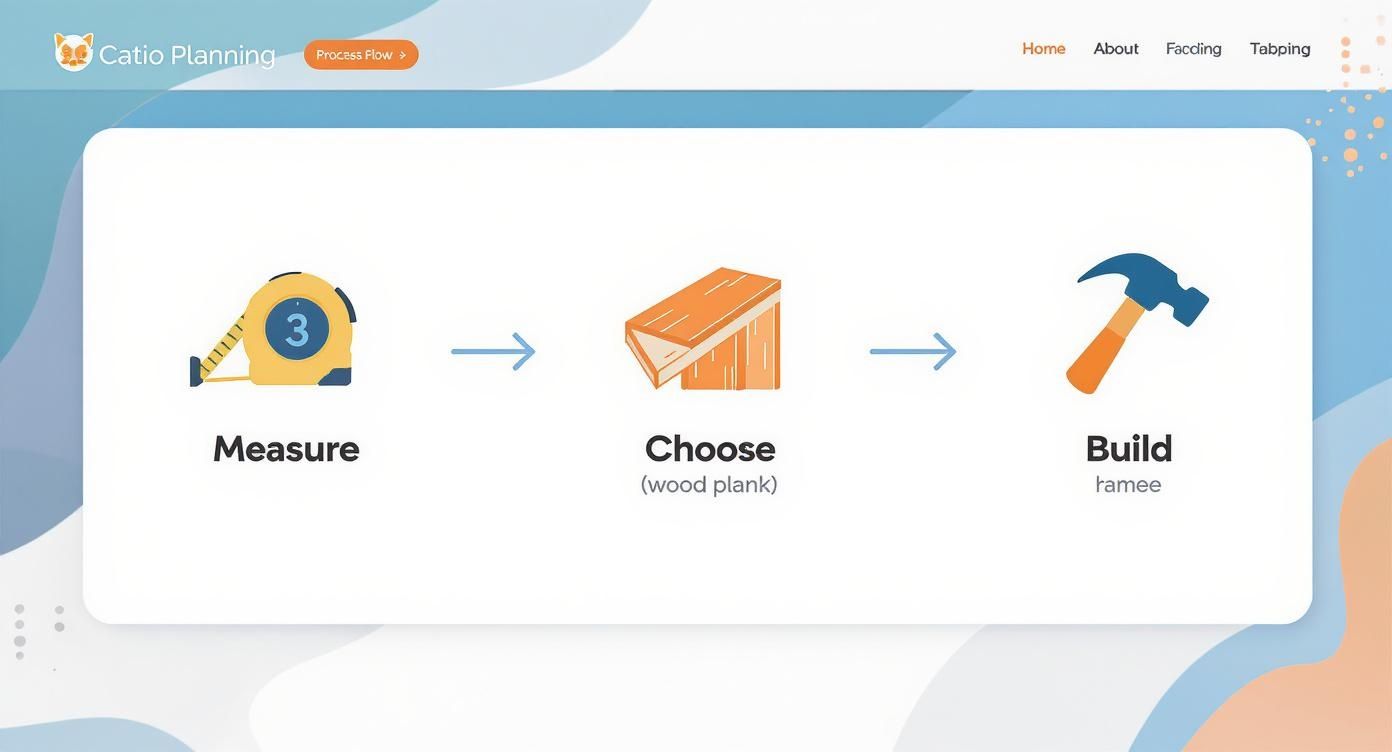
As you can see, the secret sauce is moving from precise measurements to the right materials, and finally, to careful assembly.
Essential Catio Building Materials
Before you start cutting, let's talk about the core components. Having everything on hand makes the whole process smoother. Here's a quick checklist of the must-haves for a solid wooden frame catio.
| Material | Recommended Type | Floofie's Pro Tip ✨ |
|---|---|---|
| Lumber | Pressure-Treated Pine or Cedar (2x4s and 2x2s) | Cedar is naturally rot-resistant and smells amazing, but pressure-treated pine is a great budget-friendly choice. |
| Screws | 3-inch exterior-rated deck screws | Don't skimp here! Weather-resistant screws prevent rust streaks and keep your frame solid for years. |
| Wire Mesh | 14-gauge welded wire with 1.5" x 1.5" openings (or smaller) | This gauge is strong enough to keep predators out and your cat in. Anything larger might pose a risk. |
| Staples | Heavy-duty staples (e.g., T50) for a staple gun | Get more than you think you'll need. You'll be using them every few inches to secure the mesh tightly. |
| Roofing | Corrugated polycarbonate or asphalt shingles over plywood | Polycarbonate panels are lightweight, easy to install, and let in that glorious sunshine your cat loves. |
| Hardware | L-brackets for shelves, hinges and latch for a door (optional) | Strong L-brackets are non-negotiable for creating safe, sturdy perches that can handle a pouncing floof. |
This list covers the basics for a fantastic build. Now, let's turn that pile of materials into something amazing.
Cutting Your Lumber to Size
Precision is your best friend here. Before you make a single cut, remember the golden rule of DIY: measure twice, cut once. Seriously, Floofie will judge you if you mess this up.
Lay out your pressure-treated or cedar lumber and carefully mark your cut lines based on the dimensions from your plan. A circular saw or miter saw will give you those clean, straight cuts you're looking for.
You'll need pieces for:
- Four vertical posts (the height of your catio)
- Top and bottom frame pieces (for the front, back, and sides)
- Horizontal supports (for stability and for mounting shelves later)
Once everything is cut, lay all the pieces out on a flat surface to make sure they match your blueprint. It's so much easier to recut one board now than to discover a mistake after you've started assembling!
Assembling the Main Structure
Now for the super fun part! Start by building the two side panels. Lay two vertical posts on the ground and connect them at the top and bottom with your horizontal side pieces, forming a rectangle. Use a carpenter's square to make sure your corners are a perfect 90 degrees—this is critical for a stable, non-wobbly structure.
Secure the joints using 3-inch weather-resistant deck screws. Once both side panels are built, stand them up and connect them with the front and back frame pieces. Just like that, you have a 3D box! It's starting to look like a catio, isn't it? 🤩
Floofie’s Construction Tip: "Get a buddy to help you hold the panels steady while you drill. It makes assembly way faster and safer. Plus, you can bribe them with tuna... I mean, pizza... when you're done!"
If your catio entrance involves modifying your existing screen door, having some basic screen repair skills can be a huge help. This guide to DIY window screen frame replacement has some great transferable tips.
Adding Vertical Fun with Shelves and Perches
A catio isn't just a box; it's a vertical playground! Cats are natural climbers and love surveying their kingdom from up high. Adding shelves at different heights encourages exercise and creates the perfect spots for sun-puddles.
Use the same lumber from the frame to cut your shelves. Attach them to the vertical posts using sturdy L-brackets or by screwing them directly into the frame's horizontal supports. A staggered pattern creates a fun, ladder-like path for your cat to explore.
Want a luxury upgrade? Wrap one of the posts in sisal rope for a built-in scratching surface! For more ideas, our guide on building a DIY cat condo has some great tricks you can adapt for your outdoor space.
Attaching the Wire Mesh Securely
This is the most critical step for safety. Your catio must be completely secure to keep your kitty in and any unwanted visitors out.
Roll out your 1.5" x 1.5" 14-gauge welded wire mesh and cut it to fit each panel using heavy-duty wire snips. Starting at one corner, use a staple gun with heavy-duty staples to attach the mesh to the inside of the frame. Placing it inside prevents your cat from pushing the mesh out over time.
Pull the mesh taut as you work, placing a staple every 2-3 inches. Make sure you overlap any seams by at least an inch to eliminate gaps.
Key Safety Checks:
- Run your hand along all the stapled mesh. Any sharp edges? Hammer them flat or cover them with a thin strip of wood trim.
- Push firmly on the center of each panel. The mesh should be tight with very little give.
- Get down at cat-level and inspect every corner and seam for tiny gaps. A determined paw can wiggle through a surprisingly small opening!
Building a Simple, Weather-Ready Roof
Unless your catio is tucked under an existing patio cover, it needs a roof for shade and protection from the rain. A simple and effective option is a slightly sloped roof made from a single piece of plywood.
Cut the plywood to be slightly larger than the top of your catio frame. This creates a small overhang to direct rainwater away from the structure. To waterproof it, cover the plywood with roofing felt and then a sheet of corrugated polycarbonate or asphalt shingles.
Attach the roof to the top frame with screws, ensuring it's angled just enough to allow for runoff. Your cat will thank you during the first surprise sun shower! 🌦️
Installing and Securing Your New Catio
You did it! The frame is built, the mesh is on, and your catio is looking absolutely fabulous. High paws all around! 🐾 Now for the grand finale—safely attaching your cat's new palace to your home. This is where we make sure everything is sturdy, secure, and ready for the grand opening. Floofie is doing his final safety inspection, clipboard and all! 🧐
The final installation is all about creating a seamless, escape-proof connection. Whether you're a homeowner looking for a permanent addition or a renter needing a temporary, no-drill solution, we've got you covered.
Temporary vs. Permanent Installation
How you attach your catio really boils down to your living situation. Both options can create an incredibly secure space for your cat; they just use different techniques to get there.
Temporary (Renter-Friendly) Installation:
- The Power of Pressure: This method relies on a pressure-mounted sliding door pet panel. The catio itself will be freestanding, positioned so it sits perfectly flush against the pet door insert.
- No Holes, No Problem: The weight of the catio and its snug fit against your home create the seal. For extra peace of mind, you can add adjustable tension rods between the catio and an exterior wall for added stability without a single screw.
Permanent Installation:
- Rock-Solid Security: This involves directly fastening the catio frame to your home's exterior wall or trim using long, exterior-grade screws or lag bolts.
- A True Extension: This method makes the catio feel like a true part of your house. It offers maximum stability, which is great for larger catios or in areas that get high winds.
Whichever path you choose, the goal is the same—a wiggle-free, gap-free connection that gives you total confidence.
Aligning the Catio with Your Pet Door
Perfect alignment is the secret to a professional-looking and totally functional setup. You need the opening of your catio to line up precisely with the pet flap on your sliding door insert.
Start by installing your pet door panel in the sliding glass door track. Then, gently push your finished catio frame up against the house, taking care not to scratch any surfaces. Nudge it left or right until the two openings are perfectly matched. Use a level on top of the catio frame to make sure it's not leaning forward or backward.
Floofie’s Final Check: "Get down on your belly and look at the connection from inside and outside. Is there any daylight peeking through? Even a tiny gap is an invitation for a curious whisker to investigate. Make it airtight!"
Weatherproofing Your Connection
A drafty catio connection is a huge no-no. It lets cold air into your home, drives up energy bills, and just feels sloppy. Luckily, a little weatherproofing goes a long way. This has become a huge deal for homeowners, who are increasingly choosing patio doors based on energy efficiency.
In fact, the global patio doors market was valued at a massive USD 35.8 billion in 2024, partly because of this demand for better insulation and seamless indoor-outdoor living. You can read the full research about patio door market trends to see just how important this has become for modern homes.
- For Temporary Setups: Grab some self-adhesive foam weather stripping and apply it around the edge of the catio frame that will meet your house. When you push it into place, the foam compresses to create a fantastic seal.
- For Permanent Setups: Run a clean bead of high-quality, exterior-grade silicone caulk along the seam where the catio frame meets your home's wall. This creates a permanent, waterproof, and airtight bond that will last for years.
The Ultimate Escape-Proof Checklist
Before you let your fur baby loose, it's time for one last, crucial inspection. You need to channel your inner feline escape artist and test every single inch of your work. Floofie and I are here to help!
- The Push Test: Firmly push on all sides of the catio from both inside and out. Does it wobble or shift at all? If you feel any give, it's time to reinforce those connections.
- The Latch Check: If your catio has a human-sized access door, check the latch. Is it a simple hook-and-eye, or something more complex like a carabiner clip? Make sure it can't be jiggled open by a clever paw.
- The Seam Inspection: Get up close and personal with every single seam where the wire mesh meets the wood frame. Are there any loose staples? Are all the overlaps totally secure?
- The Roof Run-Through: Press on the roof panels to ensure they are securely fastened. Look for any gaps where a tiny Houdini could potentially squeeze through.
- The Floor-to-Wall Connection: Pay special attention to the bottom edge where the catio meets your patio or deck. You want absolutely no gaps that a cat could dig or squeeze under.
Once you’ve passed this rigorous inspection with flying colors, you can officially declare the catio open for business! 🎉
Enriching Your Catio for Maximum Fun
The structure is built, the door is secure, and your catio is officially open for business! 🎉 But a bare-bones box, even a safe one, is just the start. Now for the really fun part: turning that space from a simple enclosure into a five-star feline resort.
This is where you can get really creative and tailor the space to your cat's quirky personality. Think about what truly delights them—is it chasing bugs, soaking up sun puddles, or silently judging the neighborhood squirrels from a high perch? A well-enriched catio provides outlets for all these natural behaviors, keeping your kitty happy, healthy, and endlessly entertained.
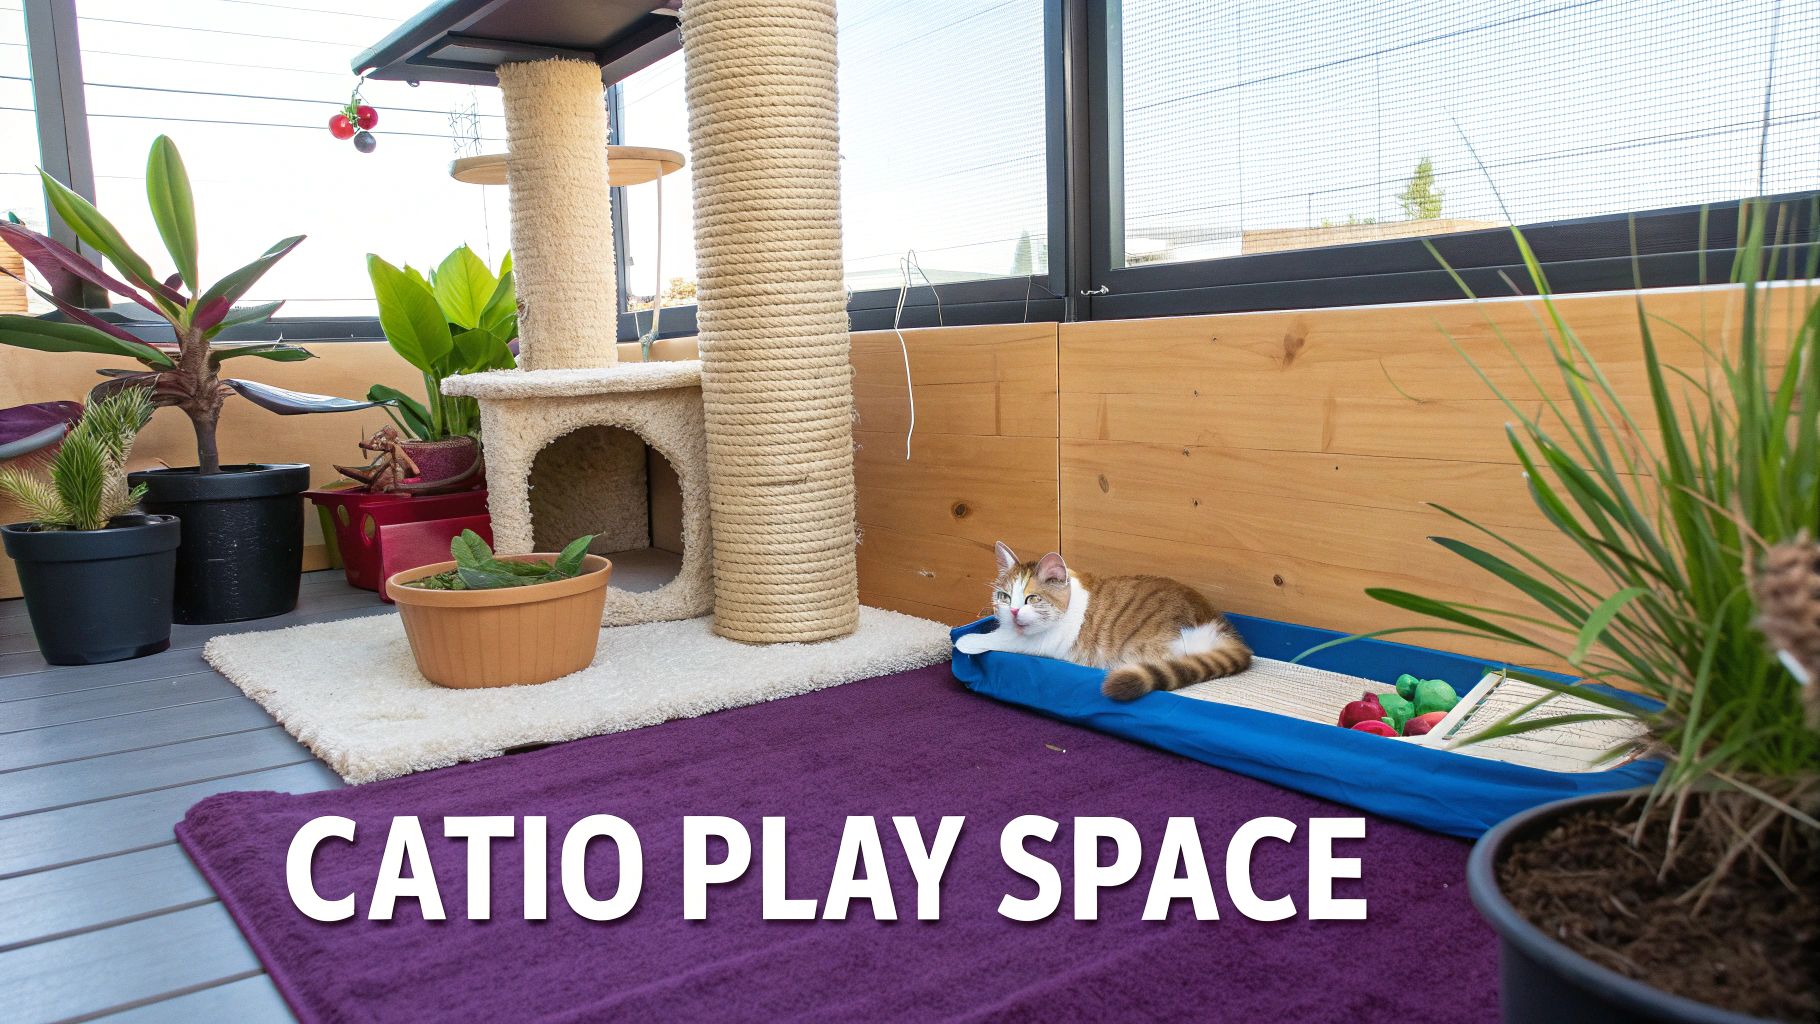
Creating a Feline Jungle Gym
Cats are climbers. Vertical space isn't just a bonus; it's a necessity for a happy cat. Adding ramps, bridges, and multi-level shelves encourages climbing and exercise, which is fantastic for their physical health.
You can even use leftover lumber from your build to create simple ramps or connect shelves with a sturdy rope bridge. A durable, weather-resistant scratching post is also a must-have. You can buy one or easily make your own by wrapping a thick wooden post in sisal rope. This gives your cat a designated spot to stretch and scratch, saving your patio furniture from certain doom.
Go Green with Cat-Safe Plants
A little greenery can turn a simple patio into a lush, jungle-like oasis for your cat. Many plants provide great sensory enrichment through smell and texture, but you absolutely have to be careful to only include plants that are non-toxic to cats.
Floofie's Approved Greenery List:
- Cat Grass (Oat or Wheat Grass): Super easy to grow in pots and provides a safe, tasty snack that can aid digestion.
- Catnip: The classic kitty favorite! A pot of fresh catnip can provide hours of blissful entertainment.
- Spider Plant: These are hardy, fun for them to bat at, and perfectly safe for curious nibblers.
- Valerian: Some cats who don't react to catnip go absolutely wild for valerian root.
CRITICAL SAFETY NOTE: Many common garden plants are highly toxic to cats. Always avoid lilies, tulips, azaleas, and sago palms, among others. When in doubt, always consult the ASPCA's toxic plant list before adding anything new to your catio.
Lounging Spots and Interactive Fun
Every luxury resort needs prime lounging areas. Position a comfy, waterproof outdoor cat bed in a spot that gets plenty of morning sun for the ultimate sun puddle nap. 😴 A shaded, cozy hideaway is also important for those hot afternoons when your cat wants to chill in comfort.
To stimulate their hunting instincts, add some interactive toys. A simple feather wand toy secured to a post can provide endless fun, while puzzle feeders make snack time a rewarding challenge. Floofie suggests rotating the toys every week to keep things fresh and exciting. For even more inspiration, explore our guide full of DIY cat enrichment ideas you can easily adapt for the outdoors.
Accessorize with Floofie's Favorites
Now for the finishing touches that make the space truly special! This is where you can let your personality (and your cat's) shine. A fun, themed water bowl ensures they stay hydrated while enjoying the fresh air, and a personalized sign declaring it "[Your Cat's Name]'s Kingdom" is always a hit.
At FloofChonk, we believe every part of your cat's life should be filled with fun. That's why we have a whole collection of paw-some accessories to complete the look. Consider adding one of our adorable cat-themed outdoor mats just outside the sliding door or grabbing a cozy, cat-print blanket for their favorite napping shelf.
With the right decor, your catio won't just be a safe space—it'll be the envy of every feline in the neighborhood. 😻
Common Catio Questions Answered
You’ve got questions, and Floofie and I have answers! 🧐 Building a catio for a sliding glass door is an exciting project, but it's totally normal for a few things to pop up that make you scratch your head. We've gathered some of the most common ones we hear to help you feel completely confident as you wrap things up.
Let's clear up any lingering kitty-cat confusion so you can get straight to the grand opening!
How Can I Install a Catio Without Drilling Holes?
This is a huge one, especially for renters! For a no-drill, landlord-friendly solution, the secret is a freestanding catio paired with a pressure-mounted sliding door pet panel. These clever inserts fit snugly into your door track and are held firmly in place by tension alone—no screws needed.
The catio itself just sits flush against the pet panel. Its own weight, combined with the snug fit against the house, creates a secure entrance without a single screw going into your walls or door frame. It's the ultimate temporary setup! 😻
What Is the Safest Wire Mesh for a Catio?
Safety is always priority number one. The absolute gold standard for catio mesh is 1.5" x 1.5" or 2" x 2" 14- or 16-gauge welded wire. This specific size and thickness hits the perfect sweet spot—it's strong enough to keep determined predators out while being small enough to prevent your cat from getting their head stuck.
Floofie’s Safety Tip: "Hiss! Steer clear of chicken wire! It's way too flimsy for a secure catio. For a luxury upgrade, look for a vinyl-coated wire. It's much softer on my toe beans when I decide to climb, and it helps prevent rust!"
A vinyl coating also adds an extra layer of durability against the elements, keeping your catio looking sharp for years to come.
Is It Safe to Leave My Cat Unsupervised?
Absolutely! A well-built, totally secure catio is designed for safe, unsupervised access. That's the whole point—giving your cat the freedom to choose when they want some fresh air. Once you’ve double-checked every item on your escape-proof checklist and confirmed there are no gaps, strong latches, and tight mesh, your kitty can enjoy their private oasis freely.
Of course, always use common sense. During extreme weather like a summer heatwave or a big thunderstorm, it’s always best to keep your furry friend safely inside with you.
How Do I Keep Bugs Out of the Catio and My House?
The wire mesh itself will do a great job stopping larger bugs like bees and moths. For an extra layer of defense, you can plant some natural, cat-safe insect repellents like catnip or lemon balm in pots around the catio. Mosquitos aren't big fans! 🌿
The most important part, though, is the pet door itself. A high-quality pet door panel for your sliding glass door with a strong magnetic closure and excellent weather stripping is essential. This creates a tight seal that prevents tiny unwanted guests from treating the pet door like an open invitation into your home.
Ready to spoil your cat with the ultimate outdoor accessories? From cozy waterproof beds to hilarious cat-themed welcome mats, FloofChonk has everything you need to make your new catio the talk of the town. Check out our collection at https://www.floofchonk.com and find the purr-fect finishing touches.