Cardboard Cat Tree DIY Your Kitty Will Love

Building your cat a cardboard cat tree diy masterpiece is the ultimate way to create a personalized playground they'll actually use. It’s a fun, eco-friendly project that saves you money and gives your feline friend the scratching, climbing, and napping palace of their dreams. Our mascot, Floofie, gives this project two paws up! 🐾
Why Your Cat Needs a Custom Cardboard Castle
Let's be real—store-bought cat trees can be expensive, clunky, and sometimes, completely ignored by our picky feline overlords. This is where a cardboard cat tree DIY project swoops in to save the day! 😼
It’s about more than just a crafty weekend; it's about building a personalized paradise designed specifically for your cat's unique personality. Whether you have a furry mountain climber, a dedicated scratcher, or a professional napper, you get to design their dream hangout spot.
Floofie, for instance, can’t get enough of his multi-level cardboard fortress, complete with secret hideouts and a prime window-watching perch. He says it's totally purr-fect! 😻
This project isn’t just great for your wallet; it’s a fantastic way to upcycle materials and reduce waste. You're building a sturdy, safe, and ridiculously fun structure that is guaranteed to earn you some appreciative head boops and purrs.
The Rise of the Cardboard Kingdom
The trend of DIY cat furniture is booming, and for good reason. Cardboard cat trees have become wildly popular thanks to their affordability and endless customization options.
In North America, where nearly 67% of households own a pet, the demand for accessible and eco-friendly pet solutions has skyrocketed. This trend is fueled by online communities where cat parents share incredible designs and building tips, making it easier than ever to get started.
Floofie's Fun Fact: Cats are naturally drawn to the texture of cardboard! It's purr-fect for scratching, which helps them shed the outer layer of their claws, mark their territory, and get a good stretch. A cardboard tree is like an all-in-one spa and gym for your kitty. 😸
More Than Just a Box
Creating a cardboard cat tree is a fantastic enrichment activity. It provides essential mental and physical stimulation, helping to prevent boredom and the destructive behaviors that come with it.
Thinking about the design process is a lot like planning a fun space for kids. In fact, this comprehensive guide to building a DIY play area can offer some great inspiration for creating an unforgettable space, focusing on design, materials, and safety that translates well to our feline friends.
For more ideas on keeping your cat happy and engaged, check out our guide on other awesome DIY cat enrichment ideas. Now, let’s get ready to build a castle worthy of your kitty! 🏰
Gathering Your Paw-some Tools and Materials
Alright, let's get our workshop ready for action! 🛠️ Before we start building a cardboard skyscraper for your kitty, we need to gather all the right supplies. A successful cardboard cat tree diy project starts with having everything within paw's reach. Trust me, it saves you from those frantic mid-project dashes to the store.
Floofie insists on safety and quality, so we've put together a list of essentials that are both sturdy and kitty-approved. Having the right tools not only makes the whole process smoother but ensures the final structure is safe enough for epic zoomies and serious catnaps. Let's get everything lined up! 📜
The Cardboard Foundation
First things first, let's talk cardboard. Not all cardboard is created equal in the world of feline architecture! You'll want to find the strongest stuff you can get your paws on.
- Double-Walled Cardboard Sheets: This is the absolute MVP of your project. Its extra layer of fluting provides superior strength and rigidity, making it purr-fect for the base and main platforms where your cat will be lounging and leaping. Look for large, clean sheets from appliance boxes or moving kits.
- Single-Walled Boxes: These are great for decorative elements, smaller hidey-holes, or interior supports where less load-bearing strength is needed. Think of them as the drywall to your structural beams—still important, but not for the heavy lifting.
Floofie’s Pro Tip: Check with local grocery stores, furniture shops, or big-box retailers! They often have mountains of high-quality cardboard they're happy to give away for free. Just ask nicely and tell them it's for a very important feline construction project. 😼
Here's a handy checklist to take with you on your supply run.
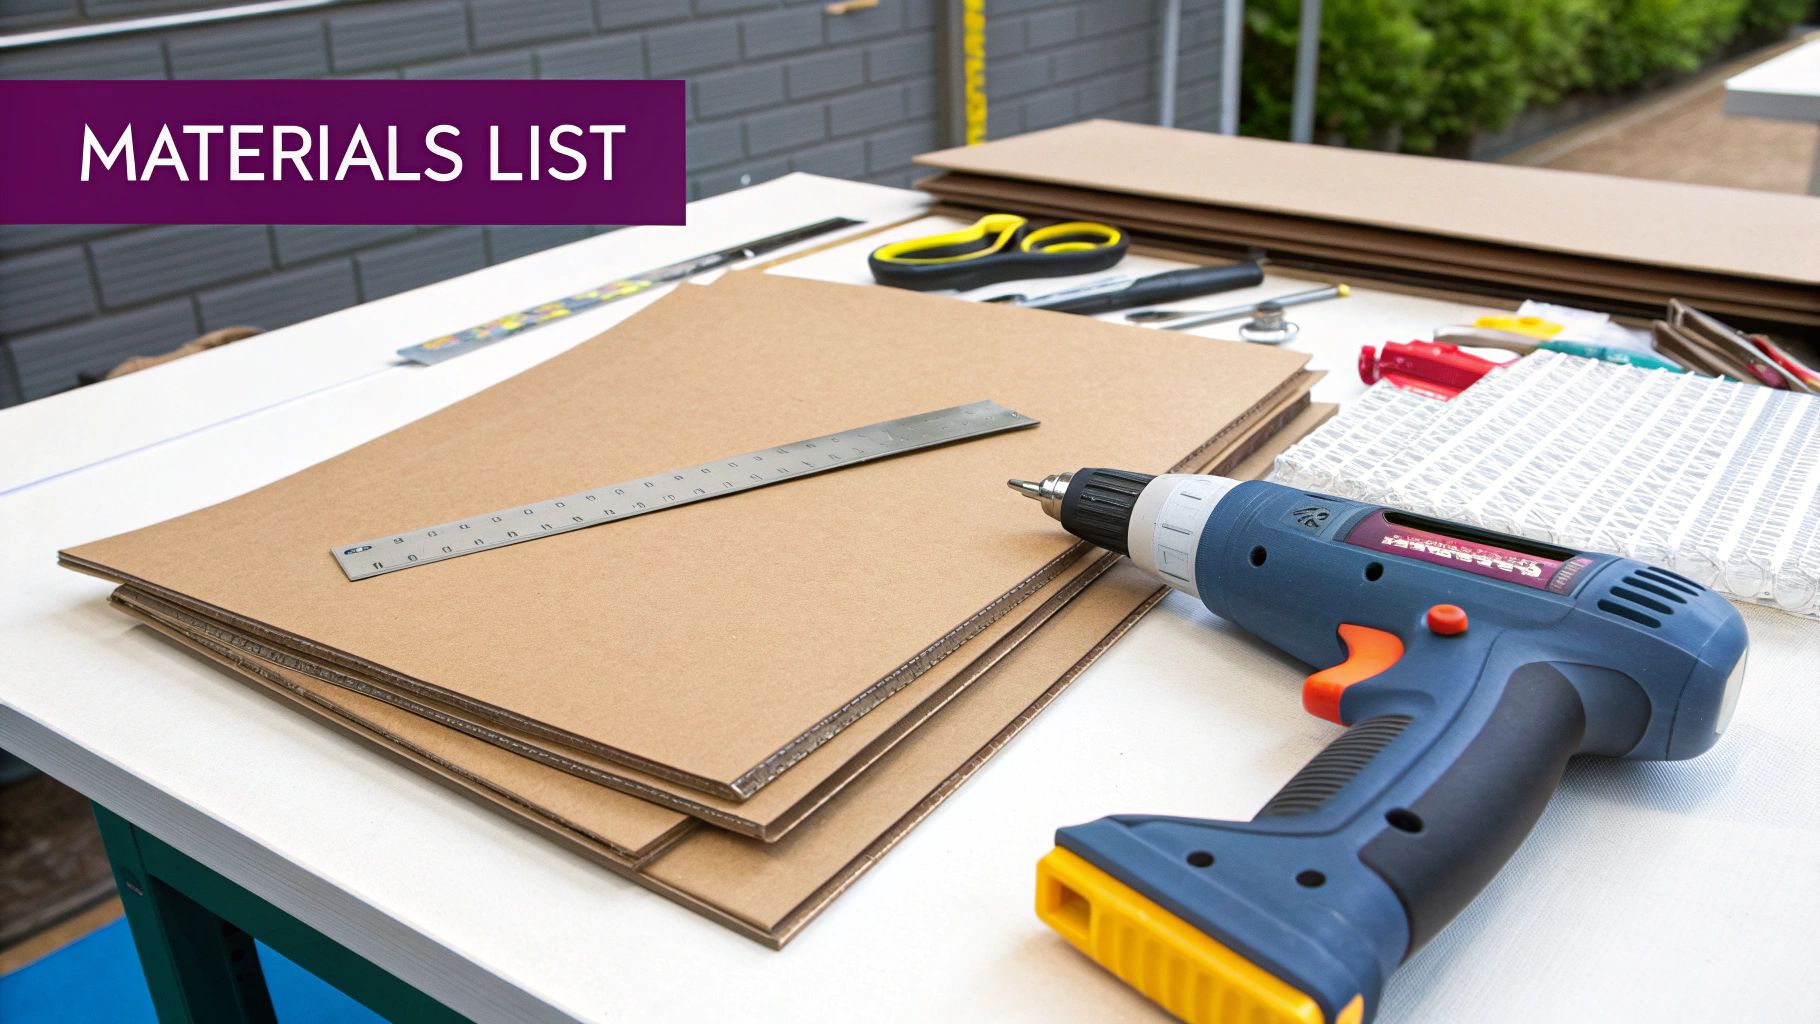
Your Ultimate DIY Cardboard Cat Tree Shopping List
Here's a checklist of all the essential tools and materials for your project, with our top picks for durability and cat safety.
| Item | Why You Need It | Floofie's Top Tip ✨ |
|---|---|---|
| Double-Walled Cardboard | The structural hero. This is for your base, platforms, and anything that needs to hold your cat's weight. | Appliance and TV boxes are the gold standard. They're built to be tough! |
| Single-Walled Cardboard | Purr-fect for decorative pieces, smaller boxes, and interior braces. | Cereal boxes and shipping mailers work great for adding detail without adding too much bulk. |
| Heavy-Duty Box Cutter | A sharp, retractable utility knife is a must for clean, safe cuts. A dull blade is a dangerous blade! | Buy a pack of extra blades. You'll go through them faster than you think for the cleanest cuts. |
| Sturdy Metal Ruler | Essential for guiding your cutter and drawing purr-fectly straight lines. | A ruler that's at least 18-24 inches long will make cutting large sheets much easier. |
| Self-Healing Cutting Mat | This protects your floors (or table) and helps keep your blade from dulling too quickly. | Go for the largest self-healing mat your budget and space allow. You won't regret the extra room. |
| Non-Toxic Hot Glue & Gun | Your best friend for fast, strong bonds. A high-temp glue gun is ideal. | Always use non-toxic glue sticks! Cats chew on everything, so safety is paramount here. |
| White PVA Glue (Elmer's) | Purr-fect for laminating multiple cardboard sheets together to create an ultra-strong base. | Apply a thin, even layer and press the sheets under something heavy (like a stack of books) to dry. |
With these items in hand, you’ve got everything you need to start building.
Adhesives and Fasteners: The Secret Sauce
Now, how do we stick this all together? The key is choosing an adhesive that's strong, non-toxic, and safe for curious sniffers and potential nibblers.
For most of the assembly, Non-Toxic Hot Glue is your go-to. It creates a fast, surprisingly strong bond that sets in seconds, which is perfect for holding pieces in place as you build. Just make sure the glue cools completely before you let your cat start their inspection.
For the really heavy-duty parts, like creating the main base, you can't beat White PVA Glue (like Elmer's). When you laminate large sheets together with it, the bond is incredibly strong once it dries. It just requires a little more patience.
This project is all about building a custom structure from scratch. But if you're looking for more ideas for creating cozy spaces, you might get some inspiration from our guide on building a DIY cat condo. It has some great tips you can adapt for your cardboard masterpiece.
Building a Sturdy Foundation for Epic Zoomies
Every magnificent cat castle starts with a rock-solid foundation. Let's be real, this is the most critical part of your entire cardboard cat tree diy project. A wobbly tower is a huge no-go for any self-respecting kitty—it’ll earn you nothing but a suspicious side-eye! 😒
We're here to walk you through creating a tip-proof base that can handle even the wildest 3 a.m. zoomies. Floofie has personally crash-tested these methods, so you know they're legit. It all comes down to smart layering and some clever interlocking tricks to turn flimsy sheets into a formidable platform.
The Art of Lamination
The secret to an unshakeable base? Lamination. It sounds fancy, but it just means gluing multiple layers of cardboard together to create one super-thick, ultra-strong piece. Think of it like making your own plywood, but with cardboard and a lot more cat supervision. 🐈
- Go Against the Grain: Take a look at your cardboard and find the corrugation (the wavy lines inside). For maximum strength, you'll want to alternate the direction of the grain with each layer. If the first piece runs north-to-south, lay the next one east-to-west.
- Get Your Glue On: Don't be shy with the white PVA glue. Slather a generous, even layer between each sheet. A paint roller or a wide brush makes this part quick and easy.
- Press and Wait: Once everything is glued, press your laminated stack under something heavy and flat. A pile of textbooks or a spare dumbbell works great. (Floofie tried to help, but he wouldn't sit still long enough!). Let it dry for at least 24 hours to create an unbreakable bond.
This simple process transforms ordinary cardboard into a dense, sturdy slab that will anchor your entire structure.
Choosing Your Base Shape
The shape of your base impacts both stability and where you can put the finished tree. A wider footprint always means better balance, so go big!
- Square or Rectangle: This is your simplest and most stable option. A large square base provides fantastic support from every angle.
- L-Shape: Purr-fect for tucking your cat tree neatly into a corner. It saves precious floor space while still offering a wide, stable footprint.
- Circle or Hexagon: These can look incredibly cool, but they require more careful planning to balance the upper levels and prevent tipping. A great choice if you're feeling a bit more ambitious.
As a rule of thumb, make sure the base is at least 1.5 times wider than the tallest point of your tree. Safety first, fur-iends!
This diagram shows how you can interlock pieces to form the core of your base assembly.
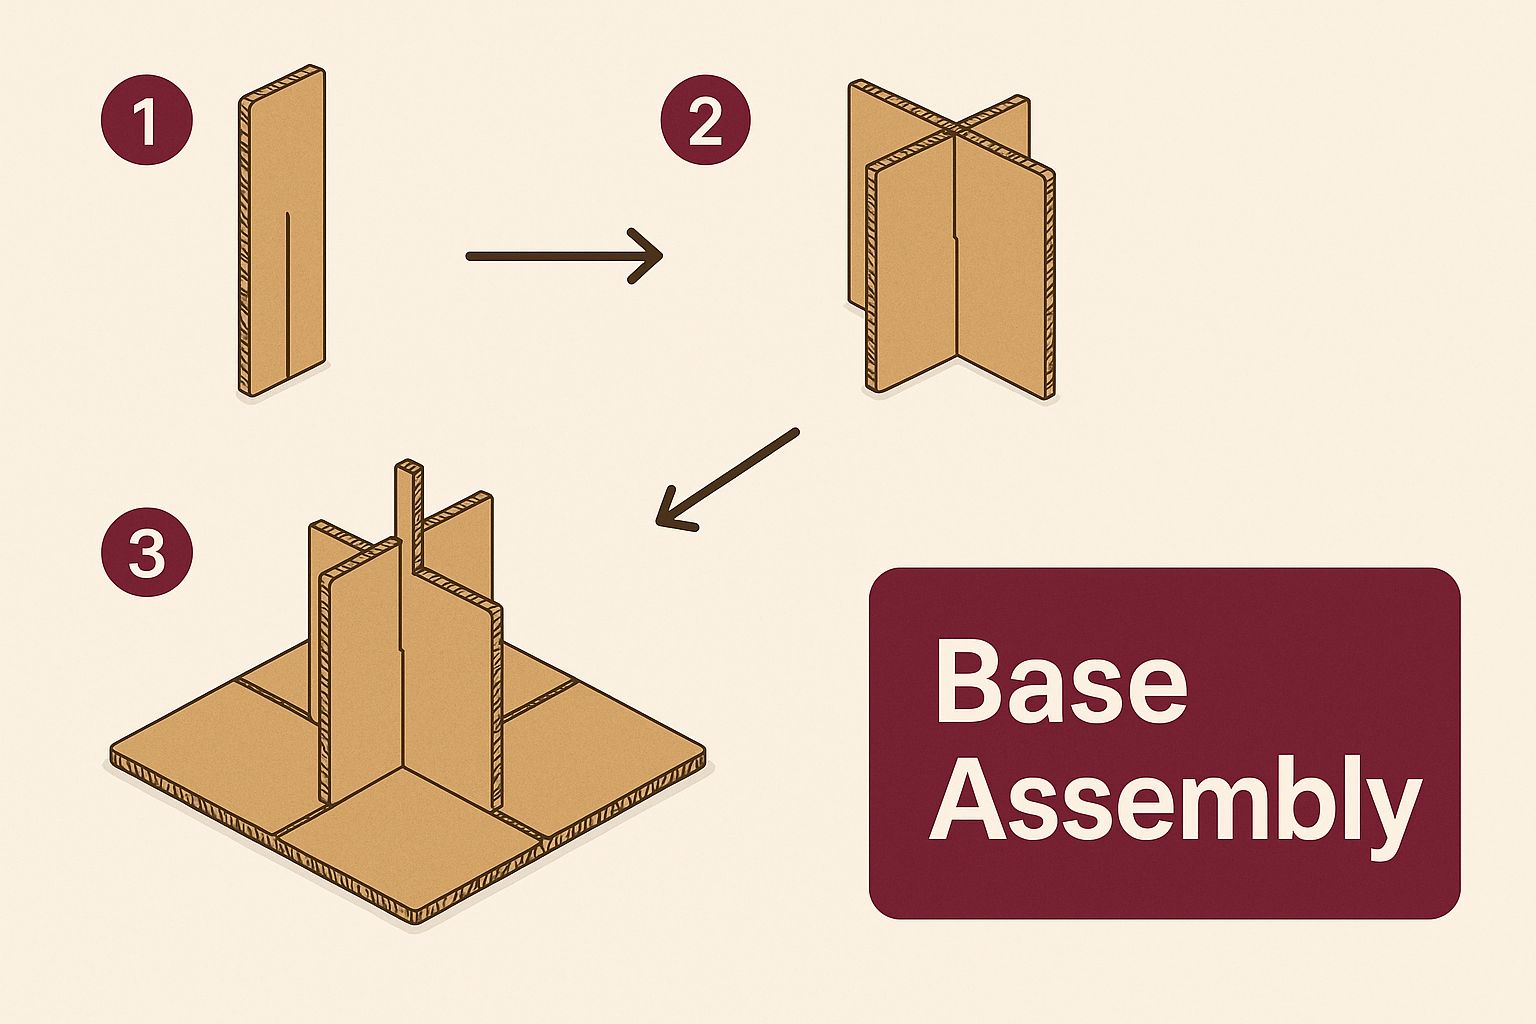
This visual really breaks down how slotted construction creates a rigid framework without relying just on glue, making the foundation incredibly strong.
The Rise of Sustainable Pet Furniture
Believe it or not, your awesome DIY project is part of a much bigger trend! The demand for cat furniture is booming, with the market for cat scratchers and trees projected to jump from USD 681 million in 2024 to USD 1.63 billion by 2031.
This growth is driven by cat parents who want sustainable, multi-functional, and customizable options. Cardboard is a superstar here—it's recyclable and biodegradable, hitting all the right notes for eco-conscious owners. You can check out more fascinating insights on the growing cat furniture market.
A sturdy base isn't just for climbing; it's the official launching pad for those wild bursts of energy. If you've ever wondered about the science behind those sudden sprints, you might get a kick out of our deep dive into the mystery of cat zoomies after pooping. A stable tree ensures they have a safe place to land!
With your foundation complete, you're ready for the exciting part—building up! 🚀
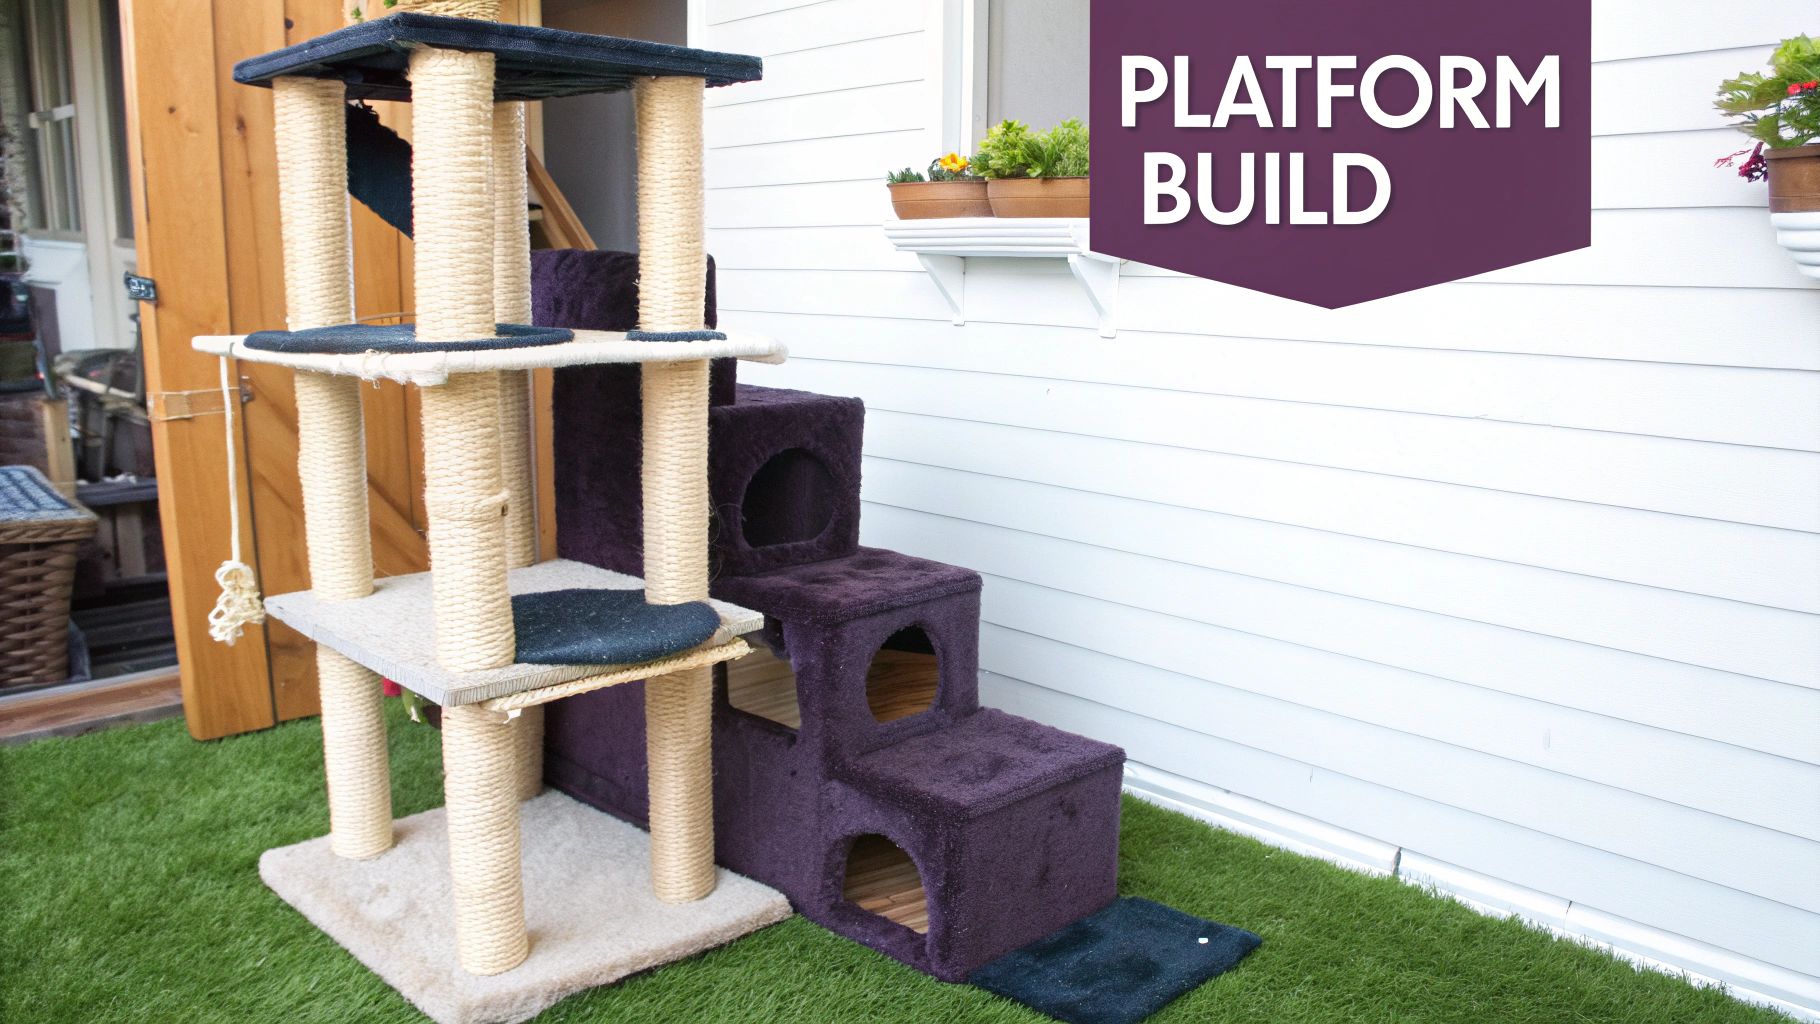
Designing Levels, Lounges, and Secret Hideouts
Alright, with a solid foundation in place, it’s time for the really fun part—building up! This is where your cardboard cat tree diy project goes from a sturdy base to a vertical kingdom for your furry overlord. 🧗♀️ Let's get creative and add some exciting levels, cozy lounges, and secret hidey-holes that speak directly to your cat's wild side.
We’re about to build a multi-story paradise that satisfies their primal need to climb, hide, and survey their domain from the highest perch. Floofie always gravitates toward the spots with the best views and the sneakiest ambush opportunities. Get ready to create a vertical world that will keep your little explorer busy for hours.
Crafting Sturdy Support Pillars
To build vertically, you need pillars that can handle serious pouncing, climbing, and the occasional acrobatic leap. We're not making flimsy supports here; we're building columns worthy of a cat temple. The absolute best way to do this is by creating super-strong cardboard tubes.
Grab a large, flat piece of double-walled cardboard and start rolling it as tightly as you possibly can. Aim for a diameter of about 4-6 inches, which provides fantastic stability. Once it's rolled, secure the seam with generous strips of packing tape or a solid spiral of hot glue.
Want to make it even stronger? Nest one tube inside another. Just make a slightly smaller tube, slide it inside the first one, and secure it with a bit of hot glue. This double-tube method creates an incredibly rigid support that simply won't buckle under pressure.
The Interlocking Platform Method
The real magic behind a durable cardboard cat tree is its interlocking design. Instead of just gluing platforms on top of pillars, we'll cut slots that let the pieces fit together like a 3D puzzle. This trick distributes weight much more evenly and makes the whole structure incredibly secure.
Here’s Floofie's go-to technique:
- Cut Your Platforms: Design your levels in different shapes—squares, circles, or even fun, wavy kidney-bean shapes. Make sure to use your laminated, multi-layered cardboard for these.
- Mark Pillar Locations: Place your support pillars on the base and figure out where you want the first level to sit. Lightly trace the outline of the top of each pillar onto the underside of your platform piece.
- Create Support Flaps: On the top of each pillar, cut four evenly spaced vertical slits, each about 2-3 inches deep. This creates little flaps you can fold outward, like a flower opening up.
- Assemble and Secure: Apply a generous amount of non-toxic hot glue to the top edge of the pillar and all over the folded-out flaps. Firmly press your platform down onto the pillar and hold it steady until the glue sets. This method dramatically increases the surface area for the adhesive, forming a super-strong joint.
Floofie’s Blueprint Tip: Before you touch that glue gun, do a "dry fit" of all your pieces. Assemble the levels and pillars without any adhesive to make sure everything lines up purr-fectly. Trust me, it's much easier to adjust a cut now than to pry apart glued pieces later! 😼
Adding Purr-sonality with Lounges and Hideouts
This is where you can really go wild and design features specifically for your cat's unique quirks. Does your kitty love to burrow? Add a cozy cube. Is she a professional bird-watcher? A top-level perch is a non-negotiable.
- The Lookout Perch: The highest point of your tree should be a simple, flat platform, maybe with a slightly raised edge. This gives your cat a secure spot to lord over their kingdom (and judge you from a safe distance).
- The Ambush Box: Every little predator needs a good hiding spot. Create a simple cube with two openings—one for entry and a smaller "peep-hole" for spying on unsuspecting feather wands.
- The Cozy Cubby: This is more of a semi-enclosed space, like a box with one side removed. It offers a great sense of security while still letting your cat keep an eye on everything going on.
Your little DIY project is part of a massive trend in pet wellness. The global market for cat trees and towers hit around USD 600 million in 2024 and is expected to nearly double by 2033. This boom is all about owners looking for sustainable, multi-functional designs that cater to their cats' natural instincts. Discover more insights about the booming cat tree market and you'll see your homemade creation is right on trend.
Adding the Purr-fect Finishing Touches
Your structure is officially built, but let's be honest—it’s not a palace until it gets the royal seal of paw-proval! 👑 This is where the real fun begins. We’re about to add all the little details that will make your cardboard cat tree diy creation completely irresistible. Think of it as transforming a cardboard skeleton into a five-star feline resort.
These final touches are what elevate your project from just a structure to an all-in-one enrichment center for your best fur-iend. We're talking about satisfying textures for scratching, super cozy spots for snoozing, and fun dangly things to bat around.
Satisfy Those Scratchy Instincts
To save your sofa from certain doom, you must provide a satisfying scratching surface. A cat's need to scratch isn't just a quirky habit; it’s a deep-seated instinct that helps them stretch, mark their territory, and keep their claws healthy. While the cardboard edges are a good start, adding dedicated textures takes it to a whole new level.
Try wrapping your support pillars tightly with some sturdy sisal rope. Just secure it with a dab of non-toxic hot glue every few inches to keep it snug. For any flat surfaces, attaching a few corrugated cardboard scratch pads is another fantastic and super easy option.
Floofie’s Tip: Don’t forget to sprinkle a little catnip on the new scratching surfaces to entice your kitty. It’s like sending a grand opening invitation they simply can’t refuse! 🎉
Create Comfy Lounging Spots
Every good fortress needs a few cozy nooks for professional-level napping. You don't need to spend a fortune here, either. An old, soft blanket, a worn-out t-shirt, or a piece of fleece fabric from the craft store works purr-fectly.
Simply cut the fabric to size and use a generous amount of non-toxic glue to secure it inside the lounging boxes or on the main perches. This one little addition provides a soft, warm spot that will quickly become your cat’s favorite place to curl up, turning a plain box into a luxury suite.
Ready to add a bit more flair? Consider dangling some fun toys for extra playtime. A simple feather wand or a few jingle balls tied securely to the undersides of platforms can provide hours of entertainment. You could even hang one of our adorable FloofChonk cat-themed keychains for a quirky, personal touch that jingles just right.
Got Questions About Your DIY Cat Tree?
Building something for your favorite feline is a labor of love, but it’s natural to have a few questions pop up. You're not alone! Let’s get into some of the most common queries we hear from fellow cat parents, with a little help from Floofie, of course. 🐾
One of the biggest questions is about strength. Can a cardboard cat tree really handle a full-grown, zoomie-prone cat? The answer is a huge YES—as long as you build it smart!
The trick is using laminated, double-walled cardboard and creating an interlocking design. This combo creates a structure that's surprisingly tough. Just remember to make the base extra wide and heavy to keep it from wobbling when your kitty makes a flying leap.
Another big one is safety, especially with glue. Is it safe for a cat who thinks everything is a chew toy? Absolutely, but you have to pick the right kind. Stick to non-toxic hot glue sticks and PVA glue (like the classic Elmer's). Once they're fully cured, they are completely pet-safe, so you can breathe easy.
Keeping Your Cardboard Creation Clean
So, what happens when that inevitable hairball makes an appearance? Cleaning a cardboard cat tree is way easier than it sounds. For little spills or muddy paw prints, a slightly damp cloth is all you need.
For those moments that require a bit more effort, here are a few tricks:
- The Vacuum is Your Friend: Grab the brush attachment on your vacuum. It’s purr-fect for sucking up all that fur and dander in seconds.
- Spot Cleaning: For stubborn spots, lightly spray a pet-safe enzymatic cleaner on a cloth (not directly on the cardboard!) and gently dab the area.
- A Little Sunshine: On a nice day, letting it air out in the sun for a bit can work wonders to freshen it up.
Floofie’s Final Thought: Your homemade cat tree is a masterpiece because you made it. Don't get hung up on making it purr-fect! Your cat is going to adore it simply because it came from you. Their purrs are the only five-star review you need. 🌟
Ready to add some extra flair to your cat-loving life? At Floofie, we've got everything from adorable cat-themed keychains to the coziest apparel. Check out our full collection at https://www.floofchonk.com and find something purr-fectly you.