DIY Cardboard Cat Furniture Your Cat Will Love

Ready to turn that mountain of delivery boxes into a palace fit for your favorite fluffball? 👑 You're in the right place! This guide is all about embracing the fun, eco-friendly, and surprisingly chic world of DIY cardboard cat furniture. We'll walk you through creating something purr-sonal and sustainable that your cat will actually use.
Why Cardboard Is a Cat's Best Friend
Have you ever wondered why your cat, just like our CEO Floofie, seems to prefer a plain cardboard box over that fancy, expensive bed you bought? It’s not just some weird quirk; it’s pure, unadulterated feline instinct! Making your own cardboard furniture taps directly into what makes your kitty tick. 😻
Cardboard has it all: it's affordable, sustainable, and hits every note on a cat's checklist. Its insulated walls create the perfect warm, cozy hideouts that satisfy your cat’s primal need to retreat into dark, den-like spaces. On top of that, the texture is an absolutely irresistible surface for scratching, stretching, and climbing—all things that keep them happy and healthy.
Floofie’s Official Opinion: "A good box is a blank canvas for adventure, naps, and asserting my dominance over the household. The crinkle sound is a purrfect 10/10." 😼
Tapping into a Feline Phenomenon
You're not the only one who's noticed this love affair. With the US pet cat population hovering around 45 million and a huge trend toward keeping cats indoors, the need for dedicated furniture that saves your sofa has exploded. This is where DIY projects really get to shine. If you want to dive deeper, you can learn more about this perfect match by checking out insights on modern cat furniture at Catster.com.
Here’s why rolling up your sleeves and building your own is a fantastic idea:
- Eco-Friendly Fun: You finally have a purpose for all those delivery boxes! It’s a total win-win: reduce waste and create something amazing for your cat and the planet. ♻️
- Endless Customization: You get to be the architect. Design furniture that perfectly fits your cat’s size and doesn't clash with your home's decor. Say goodbye to those clunky, beige-carpeted towers.
- Budget-Friendly Bliss: The main material is completely free! Your biggest investment here is your time and a few basic supplies.
Now, let's get our paws dirty. It’s time to assemble your toolkit.
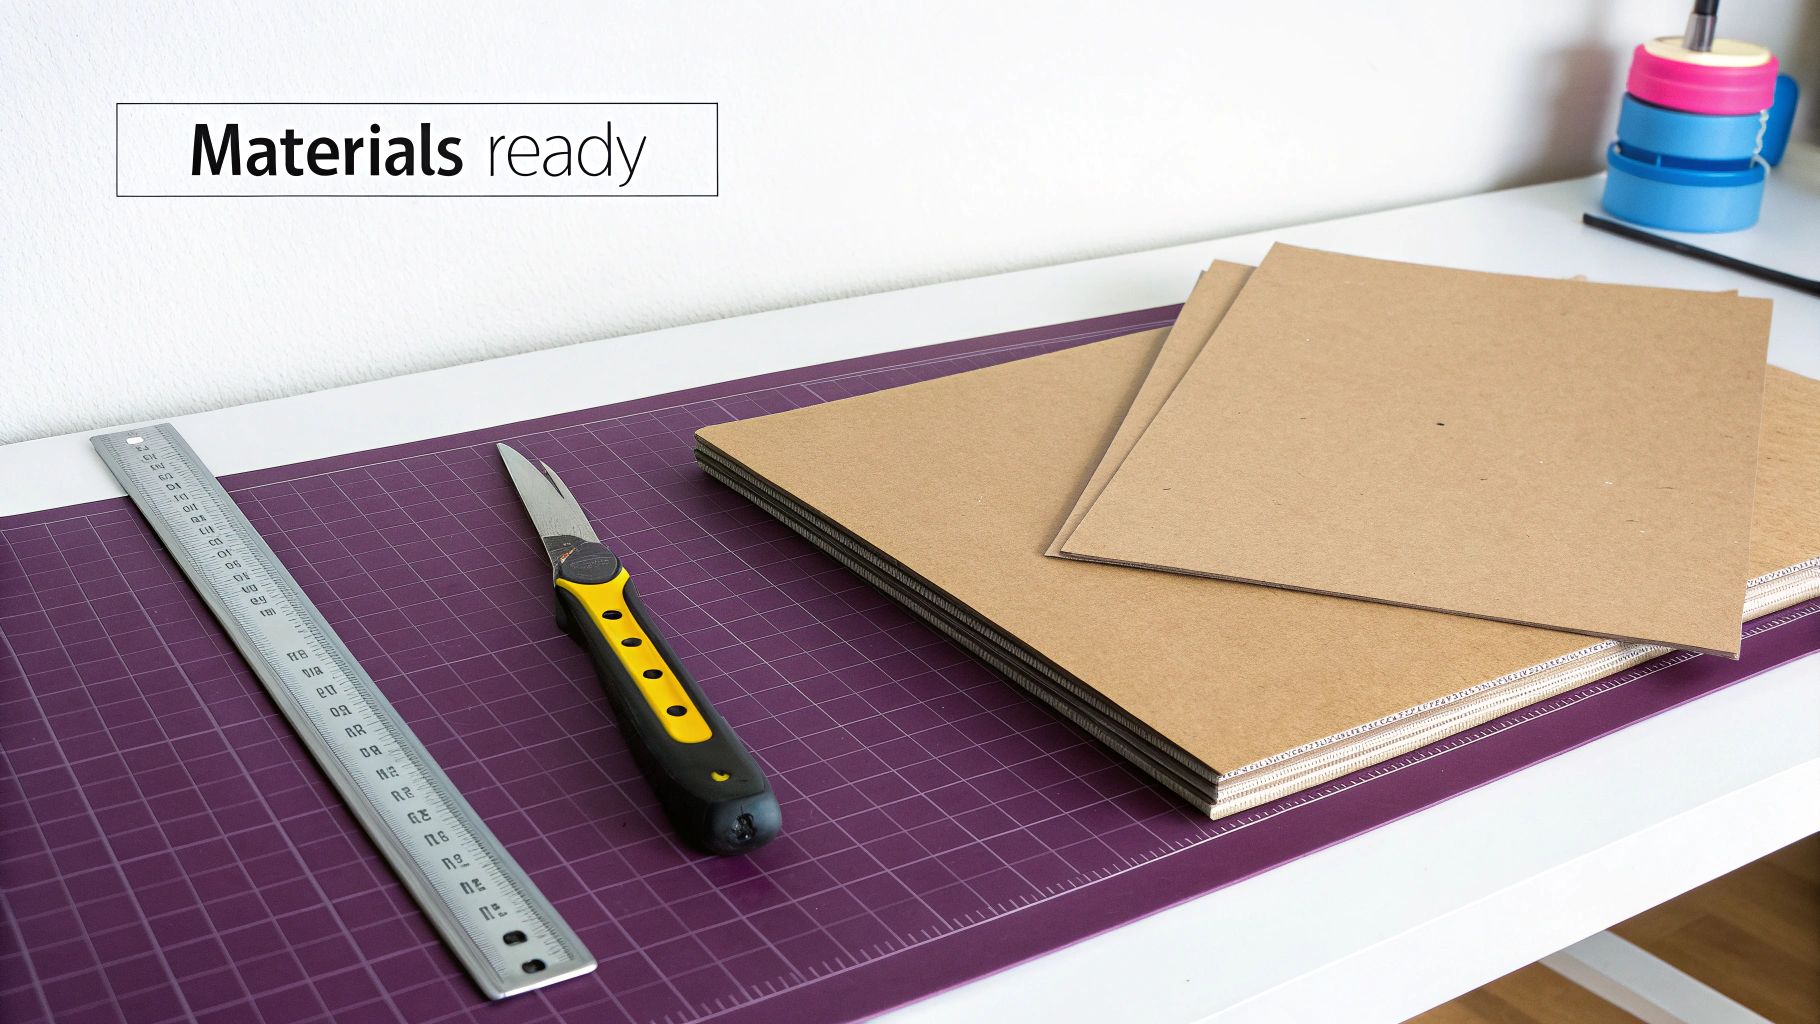
Your Cardboard Construction Toolkit
Here's everything you need for your DIY cardboard cat furniture project. We'll link to some of Floofie's favorite tools!
| Tool/Material | Why You Need It | Floofie's Pro Tip |
|---|---|---|
| Good, Sturdy Cardboard | This is your foundation! Double-walled boxes are the gold standard for creating structures that can handle epic zoomies. | Amazon boxes are great, but appliance boxes are the holy grail. Stronger, bigger, and ready for a masterpiece. |
| Utility Knife | For making clean, precise cuts. A sharp blade is non-negotiable for safety and getting those perfect shapes. | Always use a fresh blade! A dull one will tear the cardboard and make your life way harder. Trust me on this. |
| Self-Healing Cutting Mat | Protects your floors and tabletops from your very sharp utility knife. Plus, it helps keep your cuts straight. | Look for one with a grid. It makes measuring and cutting straight lines almost fool-proof. |
| Metal Ruler or Straight Edge | Plastic rulers just won't cut it (literally). A metal one gives you a sturdy, safe edge to guide your knife. | A 24-inch ruler is a great all-purpose size. It's long enough for most big cuts but still easy to handle. |
| Non-Toxic Glue | Safety first! Since cats love to chew, you need a strong glue that’s completely safe for pets, like basic white school glue. | Apply thin, even layers. Big globs of glue take forever to dry and can make the cardboard soggy. Patience is key! |
| Pencil & Marker | For tracing your designs onto the cardboard before you make the first cut. | Use a pencil for initial drafts and a fine-tip permanent marker for the final lines you plan to cut. No confusion! |
With these tools in hand, you’re officially ready to move from planning to building. Let's start transforming that pile of cardboard into something your cat will adore.
Planning Your Purrfect Cardboard Creation
Alright, creative cat parent, let's turn that pile of boxes into a blueprint for greatness! Before you even think about making the first cut, a solid plan is the secret to building amazing DIY cardboard cat furniture. This is where your vision—and your cat's deepest, most demanding desires—come to life. I bet Floofie is already supervising from his favorite nap spot. 🧐
The trick is to think like your cat. Is your kitty a majestic chonker who needs a wide, sturdy lounger? Or a tiny, hyperactive kitten who’d rather be climbing the curtains? Measuring your cat is a hilarious but essential first step. As a good rule of thumb, add at least a few inches to their length and width for any lounging spaces. Comfort is king.
Expert Tip: A cat who feels secure is a happy cat. Lookout perches and semi-enclosed hideaways aren't just for fun; they're major confidence boosters. Giving them these safe spaces helps cut down on stress and can even stop destructive behaviors. Your DIY project is a win for both of you!
Choosing Your Cardboard Adventure
To get those creative juices flowing, we’ve sketched out three fantastic project ideas. Each one is designed for a different feline personality and your own crafting skill level.
- The Simple Scratch & Lounge Pad (Beginner): This is the perfect starter project. It’s basically a thick, laminated block of cardboard, ideal for satisfying those scratching urges and for epic afternoon snoozes. Its beauty is in its simplicity and raw durability.
- The Cozy Hideaway Cube (Intermediate): For the cat who cherishes their privacy, nothing beats a classic box fort. This design involves creating a simple but sturdy cube with a "hooman-proof" entrance. It's the perfect spot for plotting world domination or just getting away from it all.
- The Modular Multi-Level Tower (Advanced): Got an ambitious builder spirit and a climber on your hands? A modular tower is the ultimate challenge. This project means creating stackable or interlocking sections with multiple perches and pass-through holes. It's a vertical playground that offers endless fun.
Blueprints for a Wobble-Free Zone
Stability is everything, especially when a case of the 3 AM zoomies strikes. Nobody wants a cardboard catastrophe! Before you draw a single line, you have to consider the physics of your cat.
A wide base is your best friend for any structure, but especially for towers. If you're building up, make the bottom level the heaviest and largest, getting smaller as you go. This lowers the center of gravity and keeps things from tipping over. Also, planning your cuts to create interlocking tabs and slots will add incredible strength—way more than just glue alone. Think of it like building with LEGOs, but for your cat.
Finally, try to map out your cuts to minimize waste. Look at your cardboard sheet like a puzzle. Can you nest smaller pieces, like support braces, inside the cutouts for bigger walls or doorways? This smart planning not only makes your project more sustainable but saves you from a frantic mid-build hunt for more boxes. Grab a pencil and start sketching—your cat’s dream home awaits! And if you need some inspiration for your workspace, a fun FloofChonk Pop Art Water Bottle can keep you hydrated while you create.
Assembling Your Cardboard Masterpiece
Alright, toolbelt on—it's time to build! This is where your blueprints transform into a glorious, cat-approved reality. We're about to walk through the hands-on assembly of your DIY cardboard cat furniture, and our mascot, Floofie, is already getting his supervisor snoozes in. Let's bring that amazing creation to life! ✨
This part of the process is all about precision and patience. The better your assembly, the sturdier your final masterpiece will be, ensuring it can withstand even the most enthusiastic pounces and late-night zoomies.
The whole process is actually pretty straightforward when you break it down.
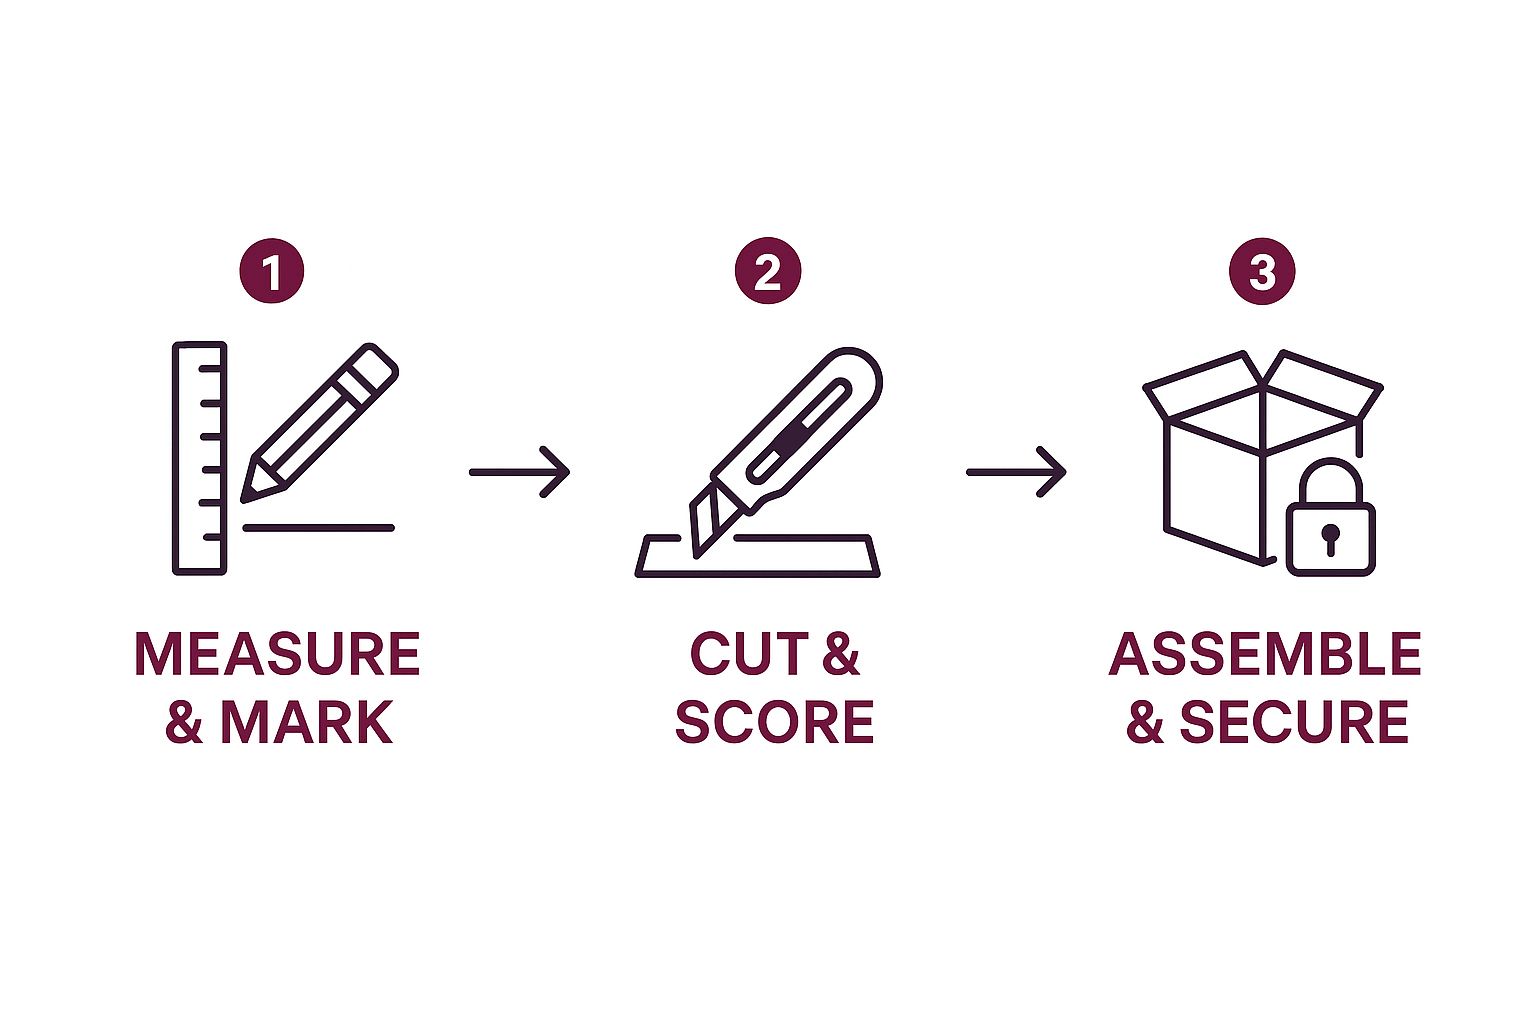
Following this sequence—Measure & Mark, Cut & Score, then Assemble & Secure—is your roadmap to a smooth, organized build from start to finish.
Cutting Cardboard Safely and Cleanly
First things first, safety is the name of the game. Floofie wants to remind everyone to keep curious paws (and your own fingers!) far away from any sharp edges. Always, and I mean always, use a fresh, sharp blade in your Utility Knife for the cleanest cuts. A dull blade is way more likely to tear the cardboard and can easily slip, which is a major safety no-no.
To get those perfectly straight lines, here’s my tried-and-true method:
- Place your cardboard on a self-healing cutting mat. This will save your tabletop and your knife blade.
- Line up a metal ruler firmly along your marked line. Don't use plastic; a knife can slice right into it.
- Apply steady, even pressure and make multiple shallow passes with your knife instead of trying to brute-force it in one go.
This technique gives you so much more control and results in a crisp, professional-looking edge. For curves, like a doorway for your Cozy Hideaway Cube, just take your time. Make a series of short, careful cuts to follow the line you drew.
Mastering the Art of Lamination
Want to know the real secret to making your cardboard furniture unbelievably strong? It's lamination. This is just the fancy term for layering and gluing multiple sheets of cardboard together to create incredibly dense and sturdy surfaces. A laminated scratch pad, for instance, can absorb months of furious scratching!
To laminate, simply coat a sheet of cardboard with a thin, even layer of Non-Toxic Glue and press another sheet firmly on top. Repeat this until you hit your desired thickness, then place something heavy on top—like a stack of books—while it dries to prevent any warping. This creates a solid block that’s perfect for perching, lounging, and, of course, scratching.
Floofie's Pro Tip: When laminating, try alternating the direction of the corrugation (that wavy inner layer) with each sheet. This cross-graining technique adds a surprising amount of structural integrity, making your furniture practically indestructible.
Joinery for a Super-Strong Structure
While glue is great, clever joinery is what truly elevates your DIY project from a simple box to a durable architectural feat. Creating interlocking slots allows you to build incredibly strong connections without a single screw or nail in sight.
Let’s use our Cozy Hideaway Cube as an example. Instead of just gluing the walls together at the corners, you can design tabs and slots that fit together like a puzzle.
- On the edge of one wall panel, mark and cut out a few rectangular tabs.
- On the panel that will connect to it, cut matching slots that the tabs will slide into.
- A snug fit is key here! You want the tabs to slide in tightly.
- For a permanent, rock-solid hold, add a bit of Non-Toxic Glue inside the slots before joining the pieces.
This method makes your furniture robust enough to handle even the most dramatic surprise kitty ambushes. After assembly, you'll want to make it extra inviting. Consider adding a cozy pillow or one of our super soft, washable round pet beds inside the cube to create the ultimate nap zone.
Now, stand back and admire your handiwork—you’ve officially built something pawsitively awesome. 🤩
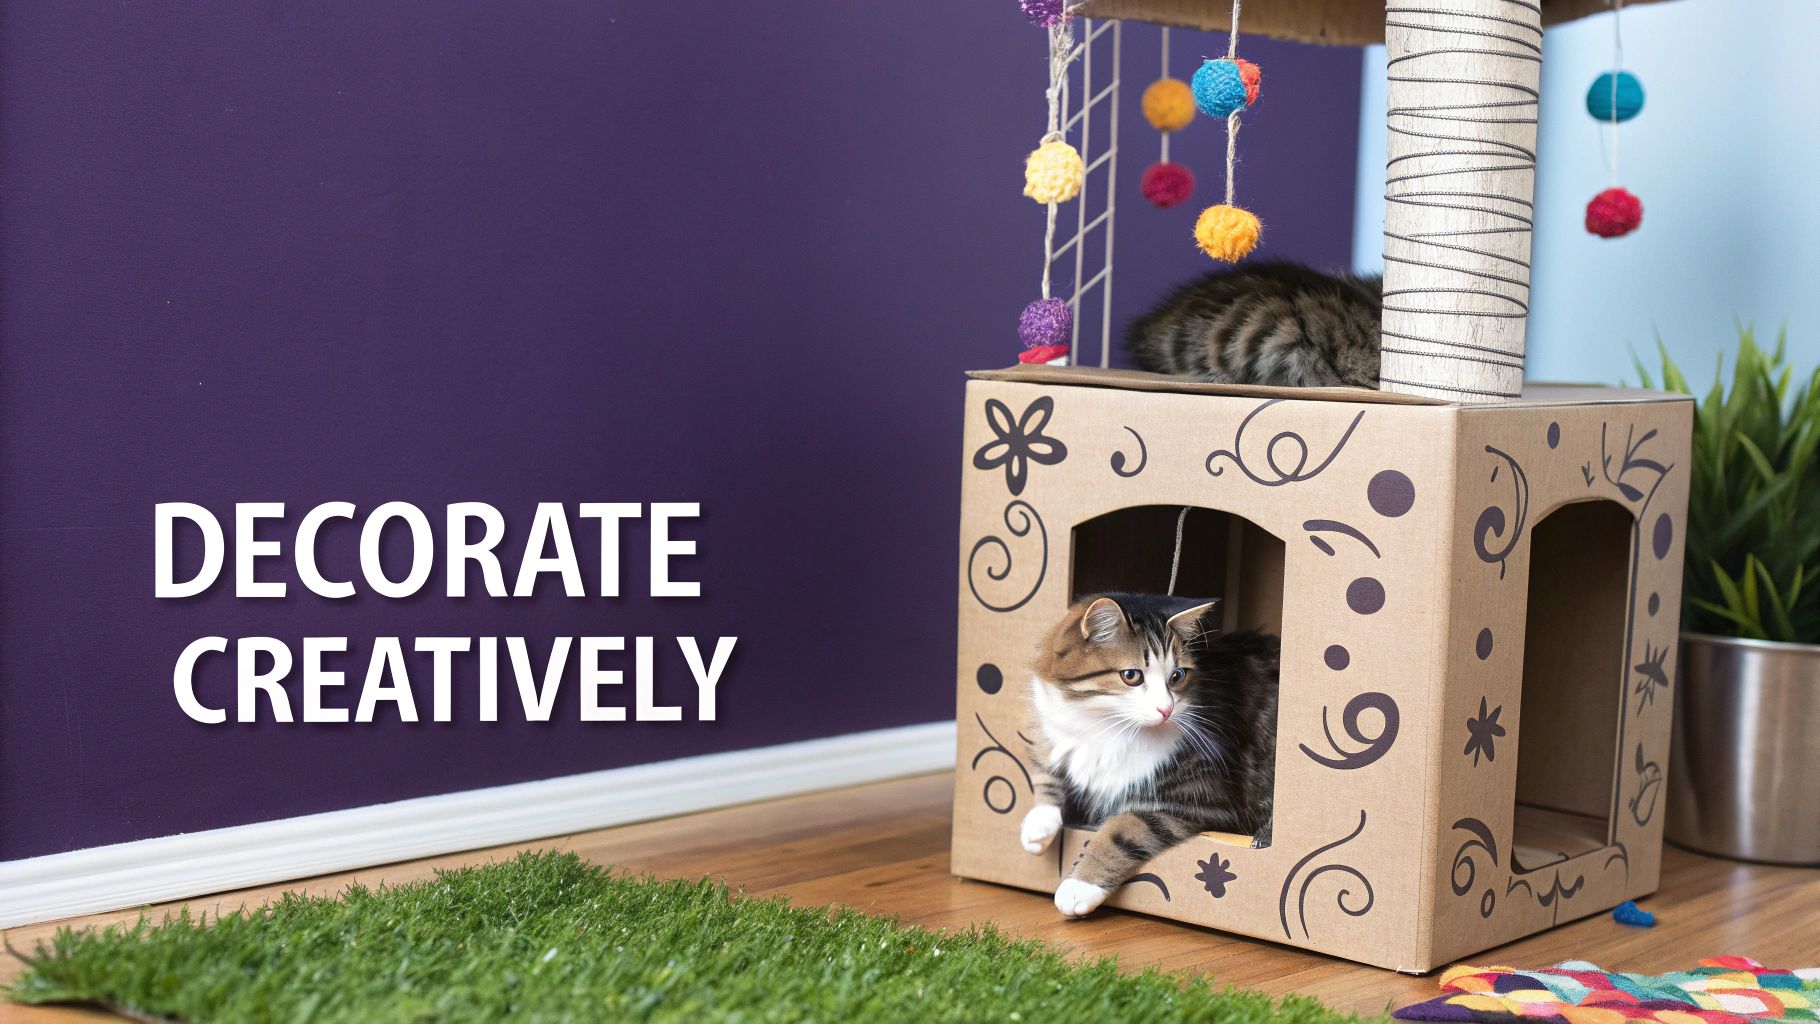
Adding Finishing Touches and Cat-Friendly Details
Your structure is officially built—high-five! 🖐️ But before your furry supervisor does their final inspection, it's time to add the finishing touches. This is where we turn a cool cardboard construction into a truly irresistible piece of DIY cardboard cat furniture that's safe, durable, and oh-so-enticing. Our mascot, Floofie, insists this is the most important part!
First things first, let's talk about those delicate toe beans. Run your hand along all the edges you've cut. If any feel a bit rough or sharp, you can easily smooth them out. A fine-grit sandpaper block or even a simple emery board from your nail kit will do the trick. This tiny step makes a huge difference in comfort and safety.
Pawsitively Perfect Decorating
Now for the really fun part—making it pretty! But remember, your cat is likely to chew, lick, or rub all over their new favorite spot, so safety is our absolute number one priority. Never use materials that could be toxic.
Here are some Floofie-approved, cat-safe decorating ideas:
- Non-Toxic Paints & Dyes: Look for water-based, non-toxic craft paints that are labeled as safe for children. For an even safer bet, you can use food-grade dyes mixed with a little water to stain the cardboard.
- Fun Fabric Scraps: Have some old fleece blankets or t-shirts lying around? Cut them into strips and wrap them around pillars or glue them onto lounging surfaces for a pop of color and texture.
- Sisal Rope for Scratching: This is the ultimate upgrade! Tightly wrap natural sisal rope around any vertical or horizontal surfaces you want to designate as scratching zones. Secure the ends with a generous dab of Non-Toxic Glue to create a super satisfying, furniture-saving scratcher. You can grab a roll of natural sisal rope from our shop.
A Quick Tip from Floofie: “My humans wrapped a post in rope and now I get to scratch something that isn’t the sofa. They seemed very happy about this. I give it two paws up.” 👍👍
The Ultimate Cat Magnet: Catnip
Let's be real—the fastest way to get your cat obsessed with their new furniture is with the magical green stuff. A sprinkle of high-quality catnip can make the introduction process a total breeze. A 2017 study found that the nepetalactone in catnip triggers a euphoric response in about two-thirds of cats, making it a fantastic tool for positive association.
When using catnip, you can rub it directly onto the scratching surfaces or sprinkle a little inside a hideaway cube. This encourages exploration and immediately signals to your cat, "Hey, this awesome new thing is for YOU!" You can also use a catnip spray for a less messy application.
By adding these feline-focused details, you're not just finishing a project; you're creating a custom-built sanctuary. You've crafted something that is safe, stimulating, and perfectly tailored to your cat's needs. Now, stand back and get ready for the inaugural pounce! 🐾
Why Cardboard Is a Smart Choice for Modern Pet Homes
You’ve seen it happen. You spend a small fortune on a new gadget, and your cat completely ignores it, opting instead for the simple cardboard box it came in. It's a universal cat-owner experience, and it’s not just a funny quirk—it's pure feline instinct. And that's exactly what your DIY cardboard cat furniture project is tapping into! 📦
There's a real science behind their box obsession, and it’s why cardboard is such a brilliant material for modern pet homes. We're living in the age of "pet humanization," where our cats are family and deserve the best. My own cat, Floofie, would be the first to tell you that this is just the proper order of things! We want furniture for them that’s fun for a case of the zoomies but also chic enough for our living rooms.
Cardboard hits that sweet spot. It's incredibly versatile, surprisingly sturdy, and sustainable. It allows for the kind of minimalist, architectural designs that blend right in with human furniture. You aren't just making a cat bed; you're joining a movement of thoughtful, design-conscious pet ownership.
The Rise of Feline-Focused Design
This isn't just a hunch; the numbers are pretty staggering. The global market for modern cat furniture is on a rocket ship, expected to soar from USD 5.2 billion in 2025 to a massive USD 10.3 billion by 2035.
What's driving this? Pet parents like us are actively seeking out beautiful, functional pieces that reflect our style and our values. The push for sustainability, in particular, makes cardboard a hero material in this booming market. You can read more about these exciting market trends here.
This data proves that building beautiful, cat-centric items isn't just a niche hobby anymore. It’s a mainstream reflection of how much our pets mean to us. Your DIY project is perfectly on-trend.
Floofie's Hot Take: "My humans are finally getting it. A truly stylish home is one designed around my napping and scratching needs. It's just basic interior design, people." 💅
More Than Just a Box
So, what elevates a DIY cardboard structure from a simple box to something special? It’s all about meeting your cat's core needs in a way that also delights you.
- Security and Confidence: A snug cardboard hideout or a perch with a view isn't just a cozy spot. It gives your cat a sense of security and a feeling of control over their domain, which is a huge confidence booster.
- Enrichment and Play: A multi-level tower or a simple scratch pad provides essential mental and physical stimulation. This is your secret weapon against boredom-induced shenanigans and shredded couches.
- Personal Connection: There's a special kind of love language in building something for your cat with your own two hands. It's a project that strengthens your bond and shows them, in a tangible way, how much you care.
Your creation becomes a statement piece that proudly declares, "A very stylish and deeply loved cat lives here." It's a fantastic outlet for your creativity. And if you're looking for even more ways to spoil your favorite feline, check out our amazing collection of gifts for cat lovers!
You’re about to create something that’s not only trendy and sustainable but also perfectly in tune with what your cat truly wants and needs.
Floofie's DIY FAQs
Got a few questions rattling around before you start cutting cardboard? I get it. To help you out, our chief feline officer, Floofie, has graciously paused his 18th nap of the day to tackle the most common queries we see about making DIY cardboard cat furniture. Let's clear things up so you can get building with confidence! 😼
What's The Best Cardboard To Use?
When it comes to building for your cat, not all cardboard is created equal. You’ll want to hunt down double-walled corrugated cardboard for any project that needs to hold up to serious scratching or climbing. This is the heavy-duty stuff you find in moving boxes or appliance packaging.
Thin materials, like the cardboard from a cereal box, just aren't going to have the strength you need. Save those for another craft day. Before you start, always give your boxes a quick scan to make sure they’re clean and free of any hidden staples or leftover packing tape.
How Can I Make It Strong Enough?
The real secret weapon for creating rock-solid cat furniture is lamination. By gluing several sheets of cardboard together with Non-Toxic Glue, you can build a dense, heavy block that’s incredibly sturdy. This method is perfect for scratch pads or the base of a multi-level tower.
Floofie’s Pro Tip: For structural pieces like walls or platforms, pay attention to the flutes (the wavy part inside the cardboard). Try orienting them in alternating directions with each layer you glue down. This cross-hatching technique creates surprising strength and makes your creation ready for even the most enthusiastic kitty parkour sessions.
Are The Supplies Safe For My Cat?
This is a huge one. Your cat will definitely be rubbing, licking, and maybe even taste-testing their new hangout spot, so everything you use has to be non-toxic.
Stick with simple, water-based glues like a basic white PVA school glue. We've linked to our favorite Non-Toxic Glue in the shop! If you want to add some color, look for paints and markers that are specifically labeled non-toxic and child-safe, or you could even use food-grade dyes. When in doubt, it's always safest to leave the interior surfaces completely plain.
Staying hydrated during your build is also key—our fun Pop Art Cat Water Bottle makes it a little more enjoyable.
How Do I Get My Cat To Actually Use It?
First off, know that your DIY project is part of a massive trend. The cat furniture market is booming, expected to grow from USD 1.5 billion in 2025 to USD 2.8 billion by 2035. Pet parents everywhere are looking for sustainable and custom options—exactly like the one you're making! You can learn more about this growing market over at Future Market Insights.
To make your new creation totally irresistible, try these tricks:
- Place it in a spot where your cat already loves to hang out.
- Sprinkle some high-quality catnip on it to spark their interest.
- Put a favorite blanket or an old t-shirt of yours inside to make it smell familiar and safe.
- A few well-placed treats and some encouraging praise usually seal the deal. Happy building! 🥳